My Phoniebox installation - revised
I built a Phoniebox for my kids, please see my first blog post for details. Overall the box works very good. But sometimes the box would restart out of the blue (sometimes multiple times in a row).
I suspect the amplifier PAM8406, connected to 5V (Pin 4) at the Pi, would sometimes draw too much current, so the whole Pi restarts. I have a second port at the installed powerbank I could use, but then the amplifier would be always on and drain the powerbank even if the box is switched off.
I finally decided to give the Hifiberry Miniamp a try. So the amplifier would be turned off, if the Pi is off and I could also replace the USB sound card I have been using, because the case and the board of the soundcard are already a little bit broken and I wanted to replace it anyway.
Hardware Installation
- Remove the amplifier PAM8406 and the USB sound card
- Disconnect the button
PLAYfrom pin 40 and connect it to pin 25 - Disconnect the button
PREVfrom pin 38 and connect it to pin 24 - Disconnect the button
VOL DOWNfrom pin 35 and connect it to pin 33 - Disconnect the button
VOL UPfrom pin 36 and connect it to pin 32 - Disconnect the button
NEXTfrom pin 37 and connect it to pin 18 - Connect the Miniamp to pin 1 (3V), pin 4 (5V), pin 14 (GND), pin 12 (GPIO18), pin 35 (GPIO19), pin 36 (GPIO16), pin 37 (GPIO26), pin 38 (GPIO20) and pin 40 (GPIO21).
-
Connect the speakers to the Miniamp (
L-+ R+-), see also the datasheet.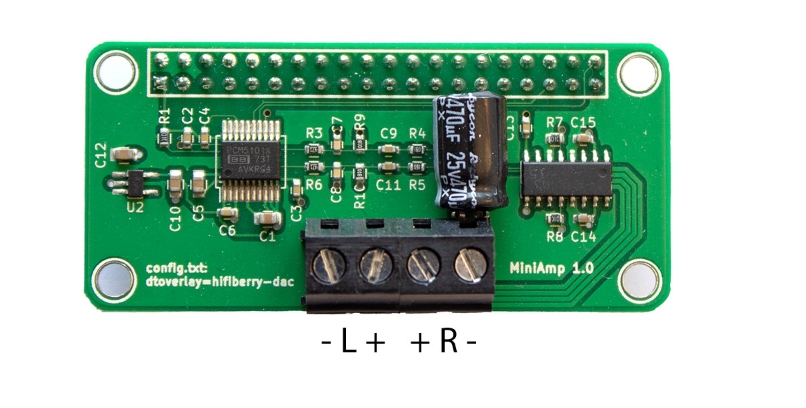
Software configuration
My Phoniebox is already installed, so I describe only the necessary changes here. For installation see my first post.
- Check especially instructions for volume control and maybe instructions from Hifiberry website
-
Enable Miniamp in
/boot/config.txtconfig_hdmi_boost=4 #dtparam=audio=on dtoverlay=hifiberry-dac
scripts/gpio_buttons.py folgendes austauschen _ siehe datein
dann so wie hier http://splittscheid.de/selfmade-phoniebox/#miniampsetup
For Christmas 2019 I built my kids a Phoniebox after a friend told me how much fun he had.
These are some notes for me to remember how I built it.
What I wanted
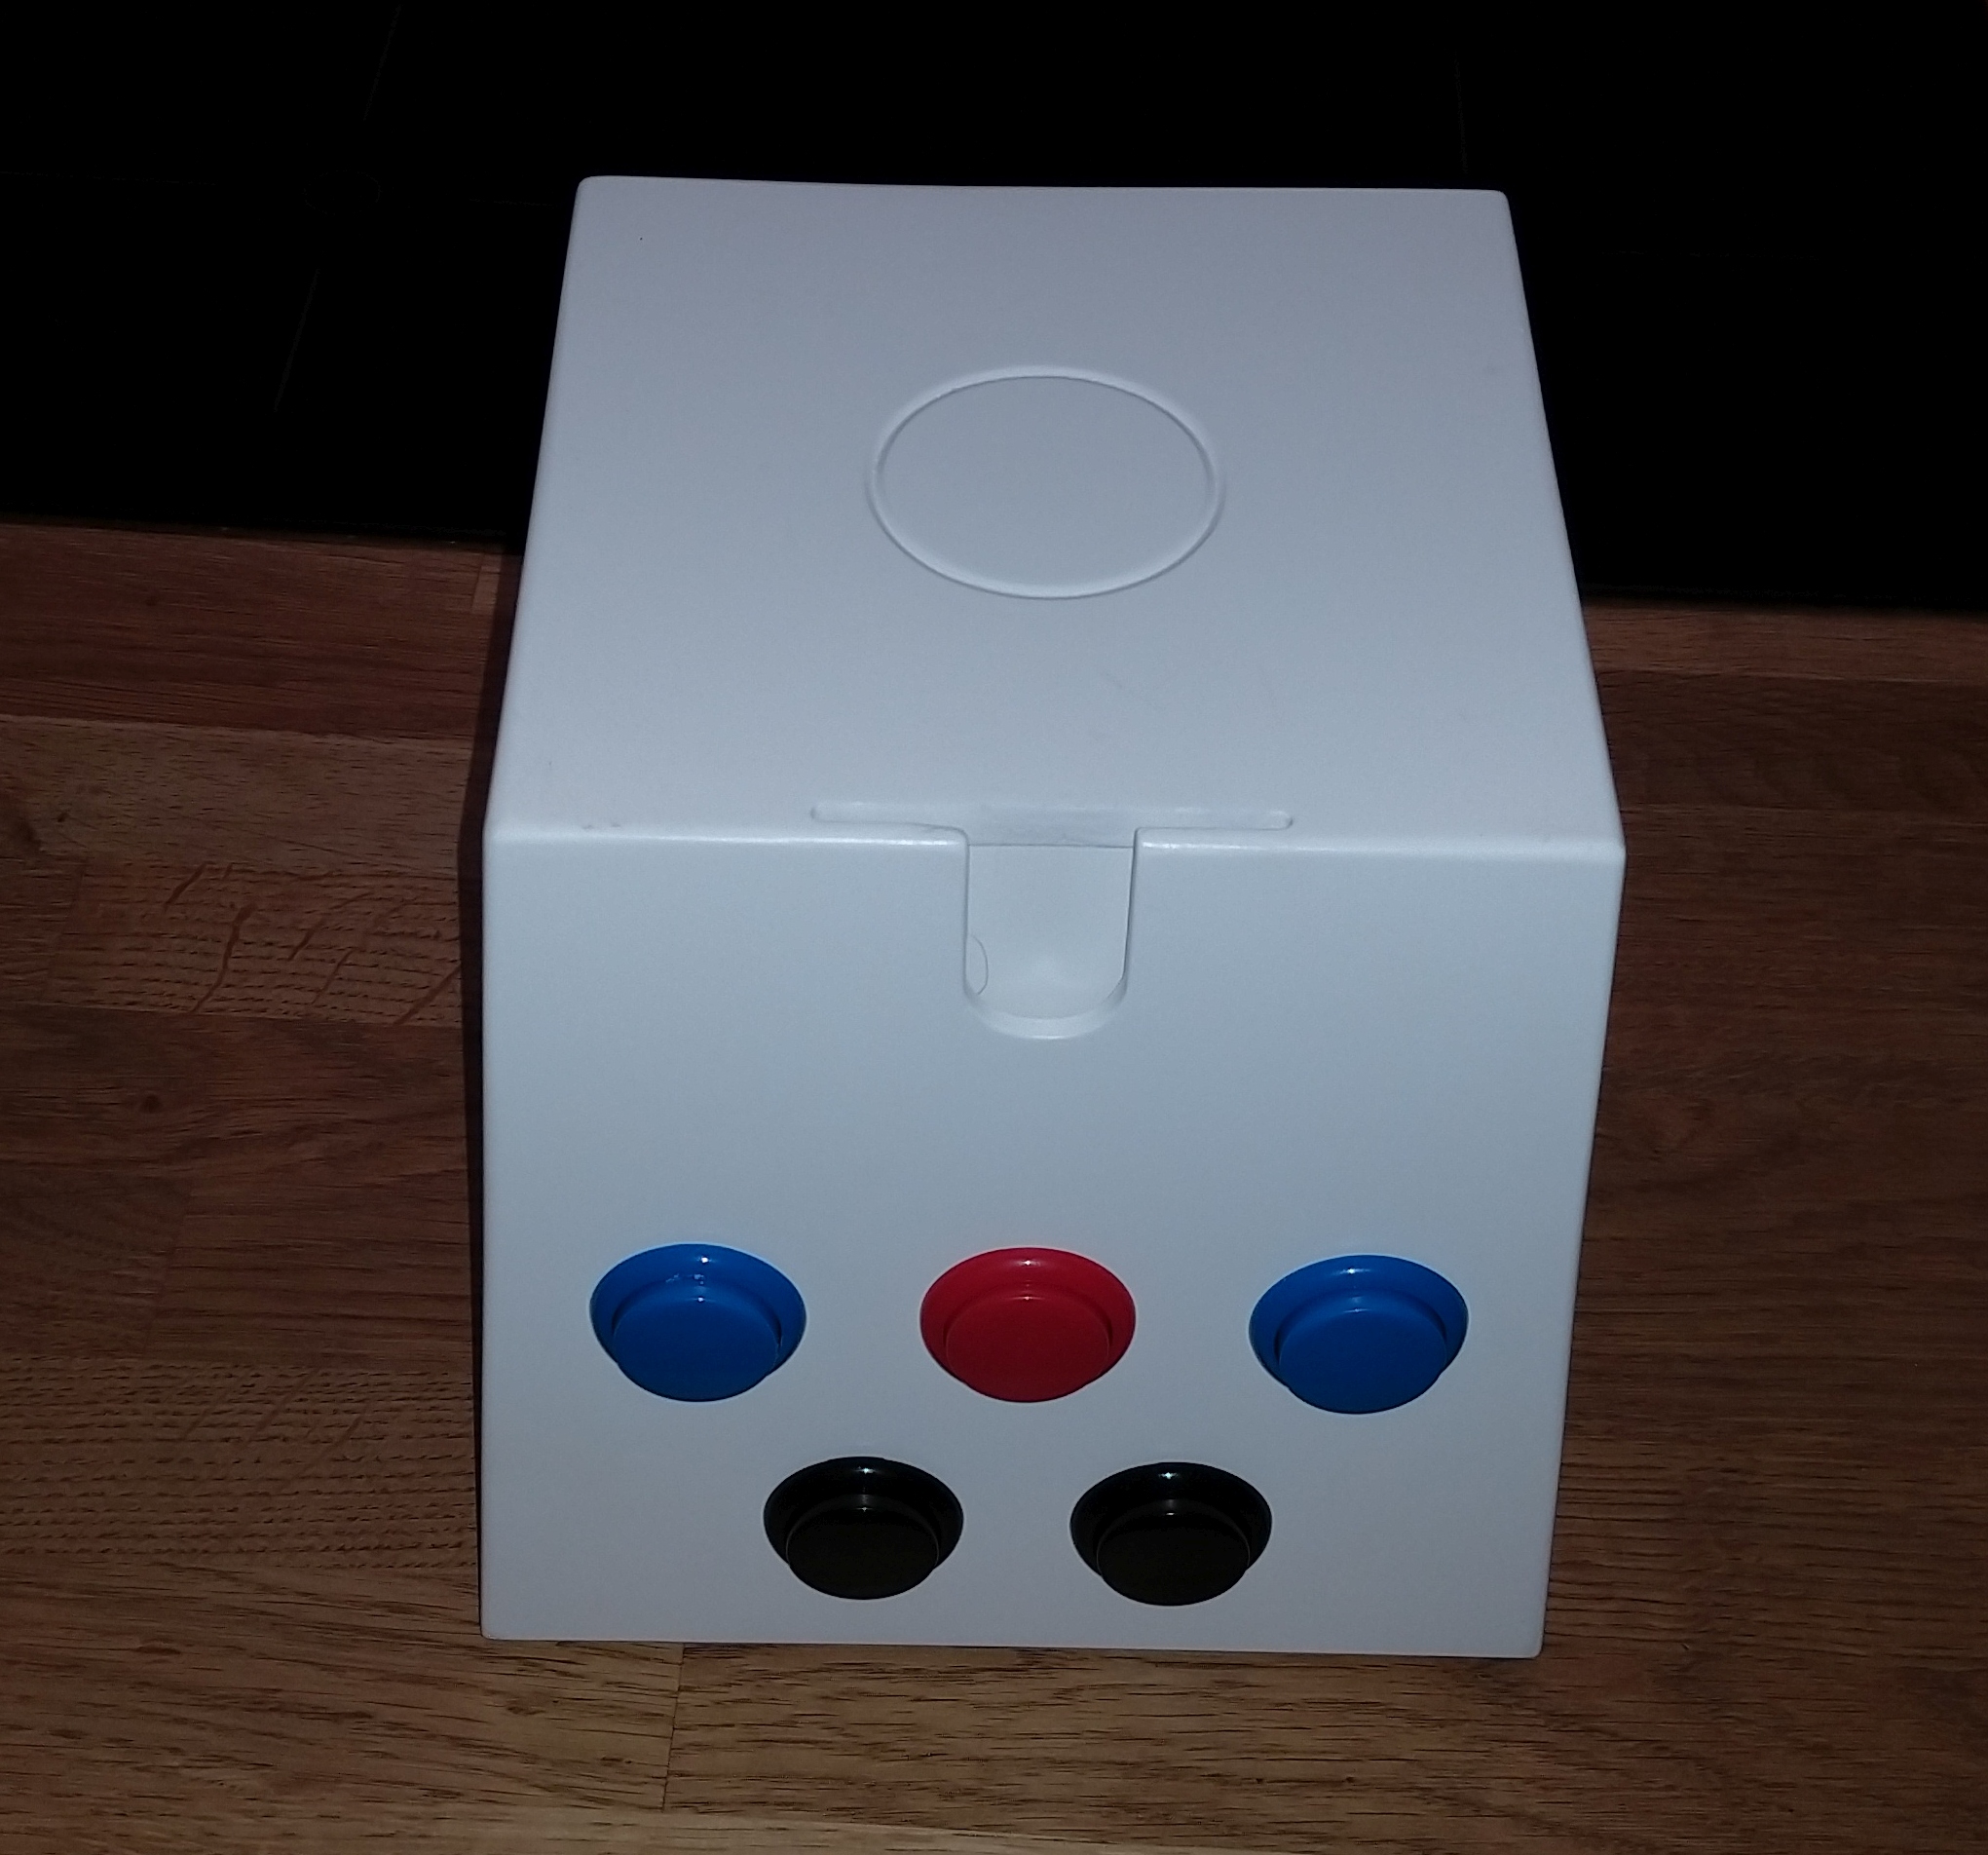
For my kids I wanted to use RFID cards. In addition the box should have buttons for Play/Pause, FF, Rwd, Volume up and Volume down.
I wanted the box portable, so I needed a power bank.
My friend has built a excellent custom-made case which fulfills my needs.
That blog post (in German) provided lots of information and I used especially the On/Off description. Thanks for providing that info!
Hardware
I used the following hardware:
- Raspberry Pi 3 (doesn’t need an active cooling)
- Ravpower ??? Powerbank
- Neuftech RFID reader
- USB sound card
- 5W Amplifier
- OnOffShim
- Arcade buttons
- Power button
- …
Building
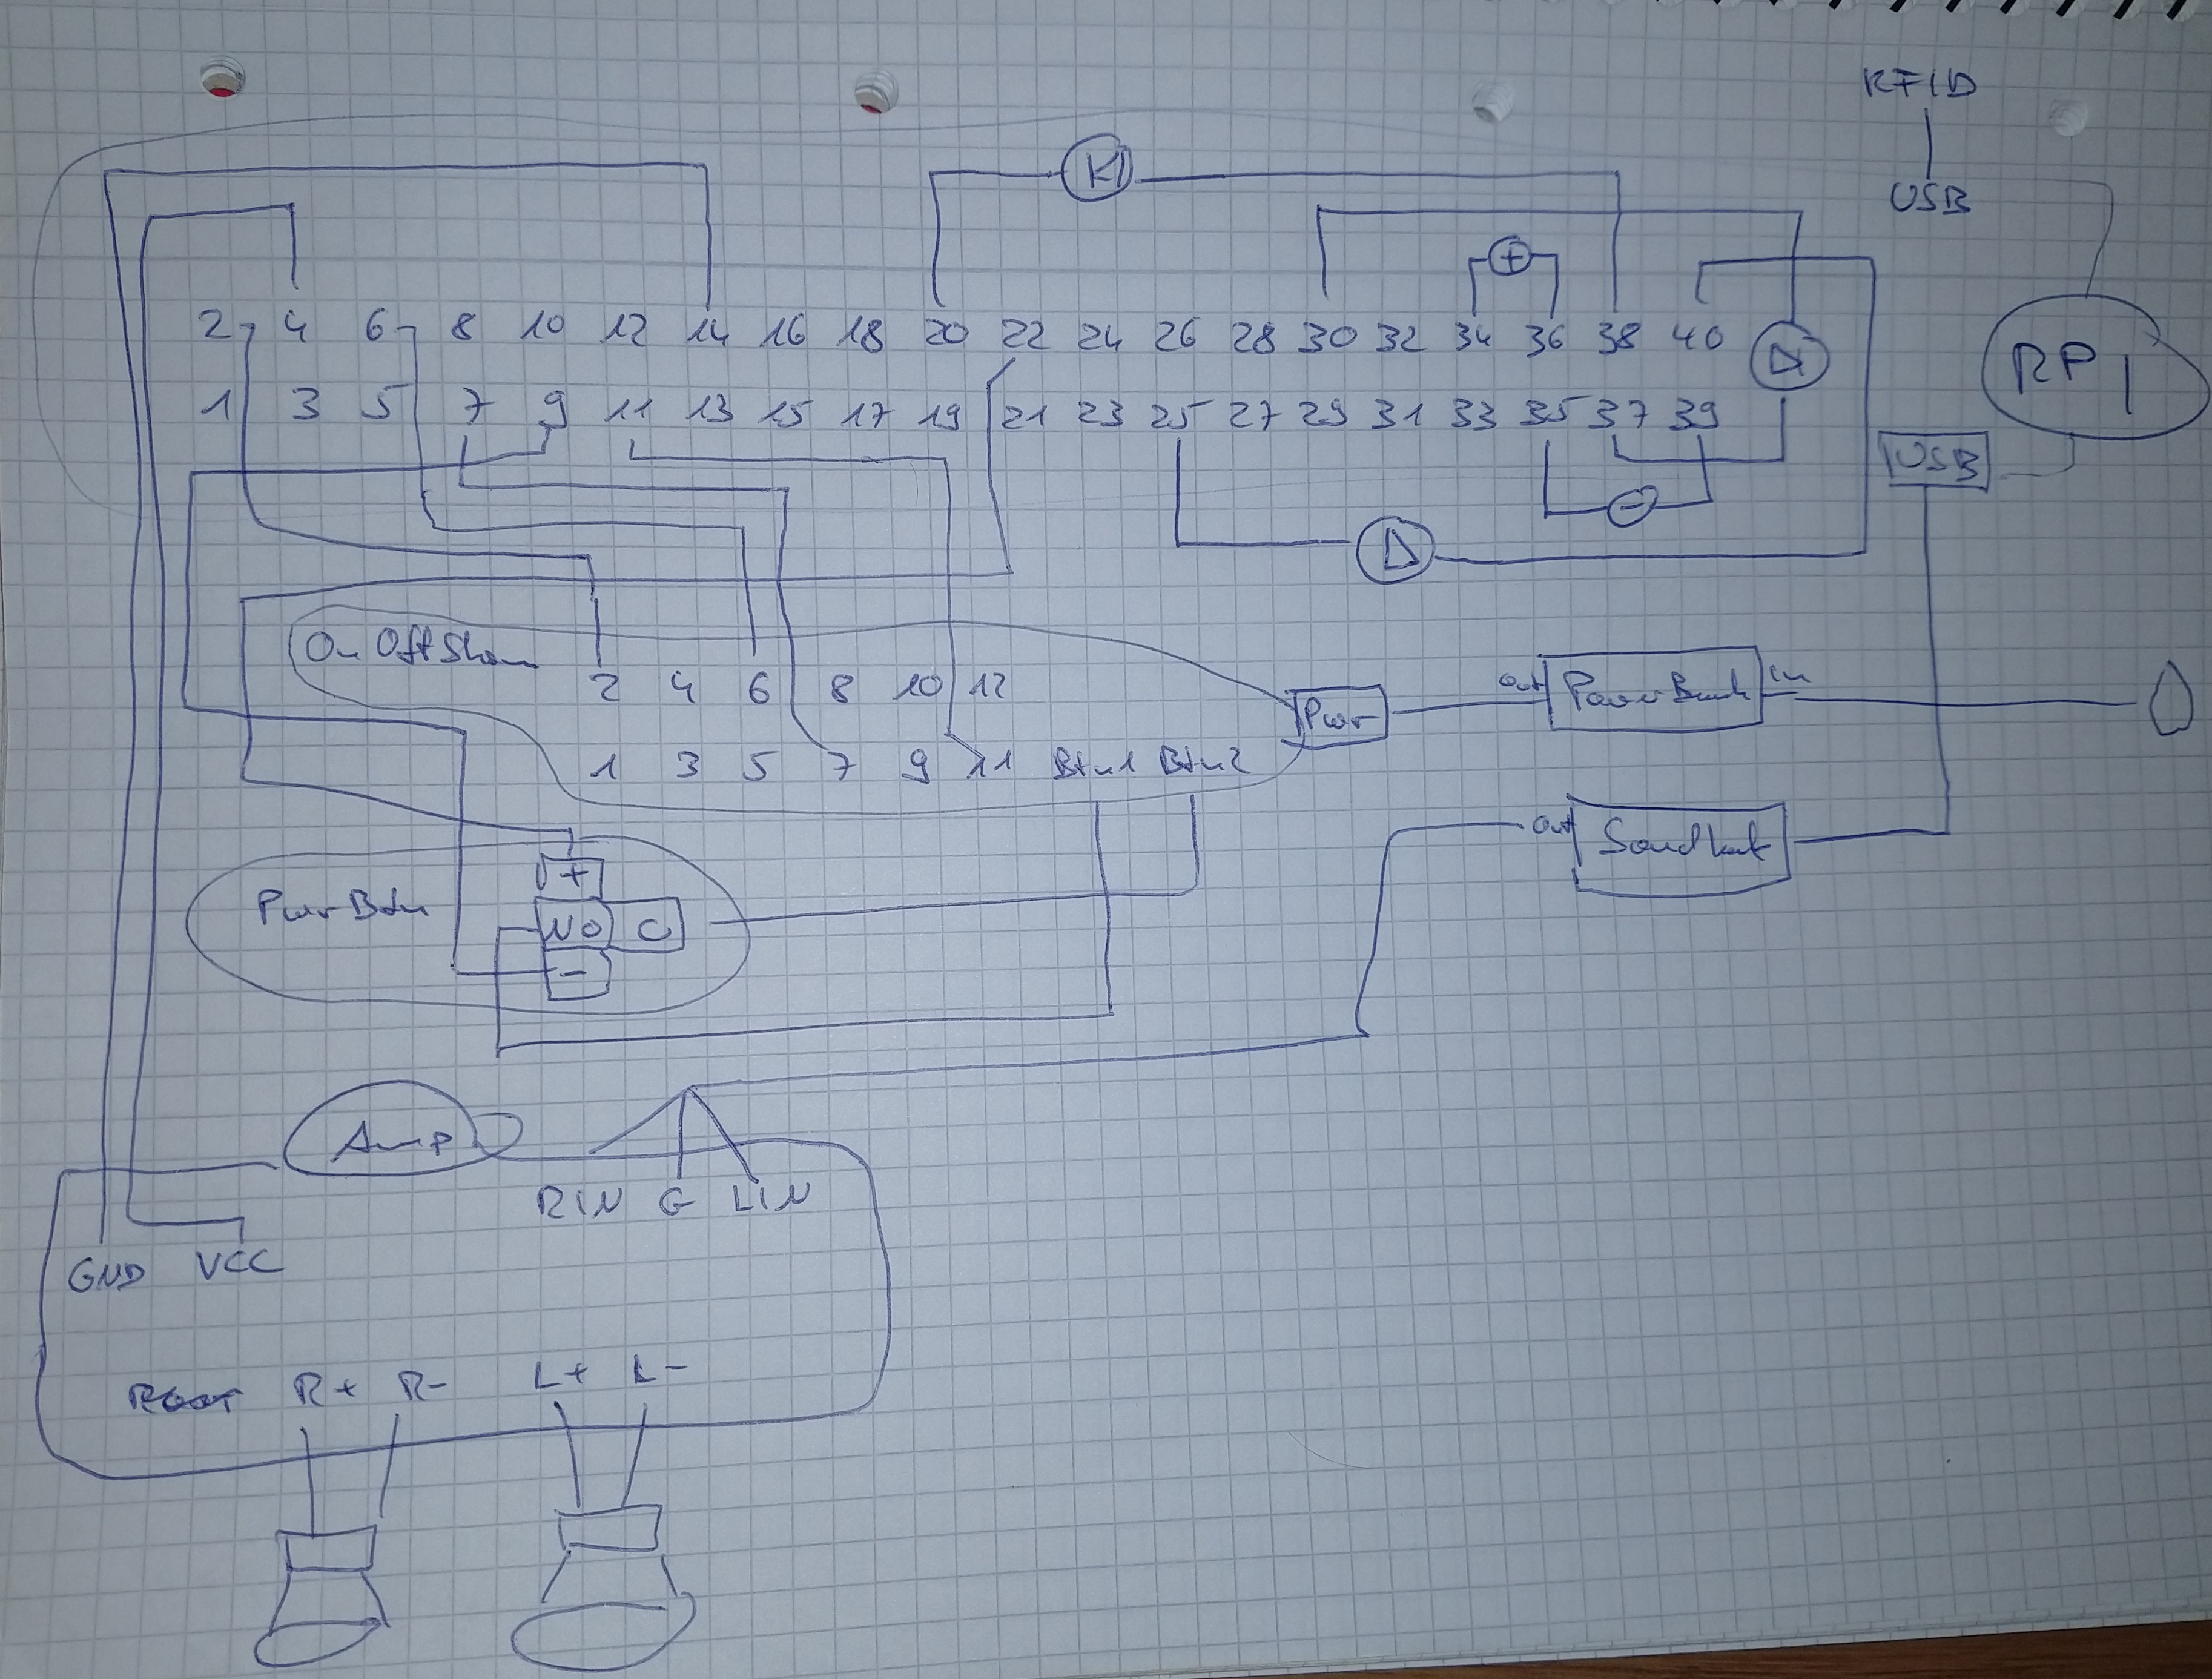
I connected and soldered everything first, before I assembled the complete box to make sure everything works.
Wiring Sketch:
Software installation
Software installation first, so everything can be tested.
- Download latest Raspian Lite image
- Install Raspberry Pi with BalenaEtcher
- Preconfigure WiFI in image, see here
- Rename to phoniebox with
sudo nano /etc/hostname - Login with ssh (default user name:
pi, default password:raspberry) -
Install Phoniebox software (for Raspian Buster)
-
Use this one line command:
cd; rm buster-install-*; wget https://raw.githubusercontent.com/MiczFlor/RPi-Jukebox-RFID/master/scripts/installscripts/buster-install-default.sh; chmod +x buster-install-default.sh; ./buster-install-default.sh -
See also here for details.
-
I use the Classic version as I don’t use Spotify and it’s supposed to be faster.
-
- I configured the sound according to this description.
- To use the buttons I configured the GPIO settings according to this manual, but without the shutdown, because I use the OnOffShim (see later steps). In the file
scripts/gpio-buttons.pythe pins can be configured and (de)activated. I don‘t use recording although the case and the hardware supports it. -
Install OnOffShim software
-
Use this one line command:
curl https://get.pimoroni.com/onoffshim | bash -
Set
daemon_active=1,led_pin=25andhold_time=1in file/etc/cleanshutd.conf -
Make sure the original Phoniebox shutdown script is used: Open
sudo nano /usr/bin/cleanshutdand replaceshutdown -h +$shutdown_delaywith/home/pi/RPi-Jukebox-RFID/scripts/playout_controls.sh -c=shutdown. Be aware thatshutdown_delayhas no effect anymore.
-
- Reboot with
sudo reboot.
Gotchas, lessons learned, etc.
- It’s really important to solder as good as possible (I’m not very good though). If you have cold solder joints it may or may not work, which can be really annoying.
- Connecting everything together first to test it is really helpful, because you don’t want to assemble everything together in a (tiny) case and then something doesn’t work.
- It really helps to sketch the wiring on a piece of paper, so you can fix possible issues or misconnections much faster.
to be continued